Showing posts with label recipe. Show all posts

Sunday, 16 November 2014

Pecan, chocolate and Cranberry Gluten/Dairy/Egg Free Cookies - Recipe

In the past few months I've had to prepare for and adhere to a low-iodine diet as part of preparations for radio-iodine treatment (radiotherapy).

I'm not going to go into the ins and outs of what's prescribed, but it does put massive restrictions on your diet - an overview is no eggs, dairy, soya, fish, shellfish, sea veg, sea salt, certain e-numbers, limited meat and limited grains. If you get really into it (which you invariably do, being in charge of your own health makes you incredibly anxious) you start questioning everything you put in your mouth and finding iodine in everything.

I spent a lot of the three weeks struggling when it came to snacks. There are only so many unsalted nuts and slices of apple with cashew nut butter on that you can take.

Thanks to a greater understanding of intolerances, there are plenty of free-from recipes out there. As I'd been eating (water made) porridge every morning, I was pretty fed up of sweet oats, so I tinkered with a few different recipes until I amalgamated a few to create this one, which isn't too sweet. The cacao nibs (raw chocolate) add a savoury bite and using unsweetened cranberries (or sour cherries if you can't find them), cuts the sweetness. Feel free to used the normal sweetened ones if you prefer.

I made these salt free, so check there's no salt added to the tahini etc if you want to follow suit, but I've not ruled out salt in this recipe (however I made them without and they tasted fab).

Unlike a lot of free from recipes, this one doesn't include any weird or highly-processed ingredients and is really quick to make.

IMPORTANT NOTE: most oats aren't gluten free as they are 'contaminated' with flour from the milling process. I found gluten free ones in my local, large supermarket, so they're not hard to find.

Pecan, Chocolate and Cranberry Gluten/Dairy/Egg Free Cookies

Makes about 10 - prep time 10 mins - cook time 15 mins

Ingredients
 - 3 tblsp tahini (salt free if you're cutting out salt too)
 - 4 tblsp runny honey (or maple syrup for a more American taste, it's expensive though!)
 - 1/2 tsp cinnamon
 - pinch of salt (optional)
 - 65g gluten free porridge oats (additive free)
 - 30g pecans, chopped
 - 30g dried, unsweetened cranberries
 - 1 tblsp cacao nibs (can replace with free-from choc if easier; I wanted recipe to be additive free)

Method
1. Pre-heat the oven to 170c fan and line two baking sheets with baking paper.
2. In a large bowl add the tahini, honey, cinnamon and optional salt, stir together.
3. Add the rest of the ingredients and mix until combined. The mixture is quite stiff, but you might need to add an extra tblsp of honey if it won't come together. Or add a tblsp vegetable oil instead.
4. Using a dessert spoon, scoop out the mixture and put dollops on the baking sheet. Press down the dollop a little. The mixture doesn't spread loads, so you'll roughly know the size of the cookie from the dollop you make, so you can adjust to suit.
5. Pop into the oven for between 10 and 15 mins, until they are golden all over and beginning to brown at the edges.
6. Leave to cool on the baking sheets as they're very delicate and only move to a rack when they are mostly cooled.
7. They'll keep in a tin for about four days before they start to dry out. Enjoy.

Ps don't be tempted to overdo the cacao nibs - they pack a bit of a punch!

Friday, 5 September 2014

Dukkah - recipe

Dukkah (or dukka or duqqa) is a North African condiment most usually attributed to Egypt and which comes in many different guises - the simplest being a few herbs, salt and pepper sold in paper cones for use in the home, the most complex being a mixture of herbs, spices, salt, pepper, seeds and nuts (traditionally hazelnuts, which I think work best).

It's one of those things I've been meaning to knock up in the kitchen for a while, but had sort of forgotten about it until a meal at Drunken Butcher's, in which he served it as part of the starter. So I sat down, read through a ream of recipes and tried a few out until I was happy with what I was eating.

This recipe started life as Yotam Ottolenghi's dukkah recipe, but I wasn't happy with the taste and I found using pre-skinned and ready toasted sesame seeds a lot easier, plus the poppy seeds add a depth of flavour you don't get in the original recipe; so this is my personal version.

Traditionally, all dukkahs are made to personal taste with each chef, cook, home and restaurant producing their own version. As there's no set recipe for what to include, use this as your starting block and then add anything you fancy. Have fun!

Dukkah
15 mins - makes a jam jar full.

Ingredients
50g hazelnuts (skin off)
2 tblsp sunflower seeds
2 tblsp pumpkin seeds
1 tsp fennel seeds
1 tblsp cumin seeds
3 tblsp coriander seeds
1/2 tsp nigella (kalonji/black onion) seeds
2 tblsp toasted sesame seeds (you can just toast your own at home if can't find toasted)
3 tblsp poppy seeds
1 tsp smoked paprika
1/2 tsp chilli powder
1 tsp sea salt (I used Maldon, but any good quality, flaky one will do)
Good few grinds of black pepper (I used about ten).

Method
1. Preheat the oven to 160c and put the hazelnuts on a baking tray. Pop in the oven and keep an eye on them to avoid burning them. They'll need cooking for about ten minutes; you want them a deep golden brown, but not burnt.

2. After five minutes, add the sunflower and pumpkin seeds to the baking tray and return to the oven. If you're toasting your own sesame seeds, add them two minutes before the nuts/seeds need to come out.

3. Whilst the nuts and seeds are baking, dry fry the whole spices one at a time in a dry frying pan on a medium hot heat. Each of the spices is done when they become fragrant - this time differs from a few seconds to about half a minute for each one. Stand over the pan and when you smell them, pop them into a spice grinder or pestle and mortar.

4. When all the whole spices have been toasted, grind them. I like to keep mine quite chunky so you get a good bit of texture in your dukkah (it's easier to do this in a pestle and mortar), but it's up to you. Once you've ground them, pop them into a jam jar with the salt, pepper, paprika, poppy seeds and toasted sesame seeds (if you're not toasting your own).

5. Take the nuts and seeds out of the oven and tip onto a wooden chopping board. Give them a minute to cool and then roughly chop them. I chopped mine into coriander seed size, but again, it's up to you how fine you make them. I do feel a bit of chunk means you can taste them better.

6. Add the nuts and seeds to the jar and screw on the lid. Shake around till it's all combined and then stick your finger in (or a bread stick) to taste - add more salt, pepper, chilli, nuts, seeds etc as required for your taste.

7. This will keep in the jar for a week or two, but I bet you can't make it last past a few days - you'll end up putting it on everything!

How to use: Dukkah is traditionally used as a dip with bread or vegetables, but it makes a great addition to salads, on toast with butter, on top of avocado on toast, with eggs. I mostly eat it with:


Avocado mushed onto brown toast with lemon and olive oil or


Lentils stirred through with harissa and lemon, topped with roasted tomatoes and soft boiled eggs rolled in dukkah.


Dukkah goes with: eggs, avocado, bulgar wheat, cous cous, spices, yoghurt, bread, veg crudités, humus, tomatoes, lentils, chilli, squash, parsley, coriander. 

NB: Toasted sesame seeds can be hard or expensive to track down in the supermarket, I usually have better luck in the Chinese or Asian supermarkets.

Tip: If you cook with a lot of spices, eschew the over priced/tiny packaged dust you find in the supermarket spice isle and either find the Asian part of your supermarket (larger supermarkets in or around cities are better for this) or Asian stores (in areas such as Rusholme) and buy spices from them. They come in much bigger bags and are better quality. A jar of nigella seeds in my local large supermarket is £1.50 (20g), a bag of them from the Asian isle in the same supermarket is 99p (300g).

If you're struggling to find spices because you don't live near a big city, then try Spices of India, good value large packs or try Bart Spices or Spice Mountain if you just want small amount and very good quality.

Saturday, 28 June 2014

Sweetcorn pancakes - recipe

One of the many breakfast pancake incarnations
It's been a long time since I sat down to write for pleasure, if I look at my list of blogs posts I am reminded that it's been at least a month.

If you trawl the interweb, there are many bloggers who have started blogs posts in a similar vein and indeed there are many blog posts dedicated to the vagaries of life interfering with the need, drive, want and ability to write.

Without laborious descriptions of the trials and tribulations that would be both irksome to read and tiresome to write, it's with great pleasure that I'm going to skip the chaff and share this recipe for Sweetcorn Pancakes with you.

If you follow my Instagram or Twitter feeds, you'll see that pancakes, and their various toppings, make up a large proportion of my weekend breakfasts. A batch of batter makes double the amount of pancakes that even I can attempt in one sitting (I tried), so I've been fiddling around in the kitchen to find other uses for the batter, bar different breakfast toppings.

These pancakes are a great basis to a vegetarian or meaty meal (you can choose what you top them with) and are pretty healthy. If you skip the chili and make them a little smaller, kids love dipping them in ketchup and are a good way of getting them to eat some veg!

Sweetcorn pancakes - serves 2
(or one if you're splitting the batter for breakfast)
Prep 10 min - cook 5 min - vegetarian


Sweetcorn pancakes

Ingredients
Basic pancake recipe
125g self raising flour (you can use wholemeal for more taste).
1 tsp baking powder
1 tsp of sugar
1 pinch of salt
1 egg
1 tsp rapeseed oil or melted butter
About 200ml of milk (depends on the flour)

Additions - if you're making this for one, half the following:
3/4 of a full tin of sweetcorn (not salted)
1 medium chili, chopped (leave the seeds in for spicy times)
Half a bunch of coriander, chopped
2 spring onions, sliced fine
Zest of a lime
Good grind of pepper

Method
1. Pop all the dry basic pancake recipe ingredients in a large bowl and add the egg, oil/melted butter and half the milk.

2. Using a balloon or hand whisk, mix the ingredients together and add more milk until you get a thick double cream consistency.

3. If you're making this for one, split the batter now. The 'virgin' batter can be stored, covered, in the fridge for a couple of days. You might need to add a little more milk to get the right consistency when you use it - for inspiration for breakfast toppings, check out my recipe HERE.

4. Add all the additional ingredients and mix in until they're all coated with batter.

5. Get a large frying pan hot and add a tiny amount of oil. Use a piece of kitchen paper to wipe this over the whole pan (or using the back of spatula/fish slice works to). Don't put too much oil in or you'll have a smoky kitchen.

6. Turn the heat to medium high and using a big spoon or a ladle, scoop out portions of batter. Usually I'll make three sweetcorn pancakes from a one person portion of batter. Smooth the pancakes out so they're all the same thickness (about one piece of sweetcorn each).

7. Fry the pancakes and when the sides start to dry up and bubbles appear on the surface, then them over with a fish slice or large spatula. Be careful as they can come apart!

8. The pancakes are done when you can stick a corner of a fish slice/spatula in the middle and batter doesn't ooze out. Put another little bit of oil into the pan and cook the rest of the pancakes. The second batch will cook quicker (your pan will be hotter), so keep an eye on them!

It's up to you what you put on top of these pancakes. You can make a pretty substantial meal by topping with a smoky tomato/pepper sauce and a fried egg. Or you can go light and healthy with a tomato/avocado salad and a slice of fish. Get creative!

These pancakes go well with: mackerel, white fish, chicken, pork, rocket, spinach, egg, tomato, pepper, avocado, tzatziki, sweet chili, chipotle, pimento, ketchup.

Sunday, 21 April 2013

Maple Syrup, Bourbon and Candied Bacon Gluten Free Cupcakes - recipes

As much as I go on about cake, I'm not what you'd call a dyed in the wool cake lover. To be perfectly honest with you, I find cakes, especially cupcakes, a sickly sweet disappointment that I wished I had never ordered in the first place. I hate talking cake.

And I'm not one of those, standing in the kitchen every afternoon, rustling up some baked goodness to underline how much I'm fucking perfect wife material; there's more to life right now than conforming to some submissive female blogger stereotype.

Now I'm going to blow all of my postulating rhetoric clear of the cake mix and post a recipe for a) cake b) a cupcake WITH frosting (shudders) and c) a cupcake topped with the sweetest garnish available to humankind. I never claimed to be consistent.

These cakes are neither clever nor particularly original, I've located the currant zeitgeist and slapped it all on a cupcake - artists copy, geniuses steal and I'm so fucking genius that a day in my life hurts. That's why I make such great tasting food and why there's booze in most of the things I make.

Meat and booze on a cupcake - I rule

If you're a lady trying to stereotypically win the heart of a manly man and his bunch of nethanderal men friends, these cakes are for you. Likewise, they're pretty damn hipster, so you can take them over to your post-ironic loft parties and be all 'saaarrriousleee, you like so put meat on a cake, OMG that's so hot right now, let's all got to Famous and queue for hours like douches and Instagram dogs ironically on the way.' Or if you just want an excuse to pour booze in everything, like I do, then these are for you - and so are AA meetings; you/I have a problem

Some words of warning:
1. These cakes are not for vegetarians or kids. You'll have to omit the booze and bacon and there's really no point in that. Go get a recipe for vanilla cupcakes if you have bacon/booze beef.

2. I've taken out quite a bit of the sugar (see above for rant on sweet cakes), but you can add this back in if you have a sweet tooth/are angling to develop diabetes (try adding another 30 grams).

3. This is a gluten free recipe - but works just as well with regular self-raising flour.

4. I lied - I actually made these with Pine (Tar) Syrup from Finland - it's nowhere near as sweet as maple syrup, it has a smokey/piney finish that fits brilliantly with the bacon and the whiskey and I'm addicted to it. Substitute maple if you can't source it (or click here if you want to).

5. This is a bit of a long recipe, but it's well worth it and these will go down like THE BOMB wherever you take them. I can make you THAT COOL.

Maple/Tar Syrup, Bourbon and Candied Bacon Gluten Free Cupcakes


Ingredients

(Makes 16 small cupcakes or about 8 muffins)
125g butter at room temp, diced
100g caster sugar
2 eggs (free range please) (and at room temperature too)
3 tblsp Tar Syrup or Maple Syrup
1 tsp vanilla essence
Pinch of salt
175g Glutafin all purpose flour (you can use Dove's Farm SR gluten free flour or regular SR flour)
1 1/4 tsp gluten free baking powder (Dove's Farm does one) (or just a pinch of baking powder if using SR flour)
1 tblsp milk

For the frosting

90g unsalted butter
150g icing sugar
3 tblsp Woodford Reserve (or any other high quality bourbon)

For the garnish

2 tblsp soft light brown sugar
2 tblsp Woodford bourbon (or any other high quality bourbon)
6 rashers of smoked, streaky bacon (good quality, not that full of water shite)

Method

1. Set the oven to 190c/gas 5 and pop the cake cases in a cupcake tin.

2. Put the butter and sugar in a bowl and mix with an electric mixer till pale and fluffy.

3. Add the eggs one by one, adding a tblsp of the flour with each egg to help prevent curdling. Mix in well and then add in the syrup, vanilla and salt and give a quick whisk to combine.

4. Fold in the flour in two lots (it's easier and helps keep some air in there). If the mix is a little sticky (you want it a little wet, at dropping consistency) - add in the milk and mix again. Add more if needed.

5. Spoon the mix into the paper cases so they are about two-thirds full. I'm not going to be a pedant and make you level them all off, just max sure they are mostly level and not slopped all over or with way more mix on one side than the other.

6. Pop in the oven for 12-15 mins and take out when they are golden on top and a skewer inserted into the middle of a cake comes out clean. Take out of the tin and cool on a wire rack whilst you prep the frosting and bacon.

7. Whilst the cakes cool, fry up the bacon. I only have a small frying pan so fried two pieces at a time - DON'T overcrowd the pan, because then then bacon won't crisp up. Fry the bacon in batches till golden on each side, but NOT over-crisp. Put the bacon on a plate to cool and pour the bacon fat from the pan into a ramekin. The bacon should have cooled sufficiently for you to cut each piece into small strips - enough for each one of your cakes - do some maths/counting.

8. Wipe out the frying pan with a piece of kitchen paper, then add the light brown sugar and place on a medium heat. Add the bourbon and the bacon fat from the ramekin - but make sure you don't pour in any of the sediment from the ramekin. Don't stir the caramel and DON'T touch it as it's fucking boiling - just swirl the pan a few times to stop it sticking.

9. Once the caramel is bubbling, chuck in the bacon strips and bubble away in there until the caramel is really reduced and all the bacon is covered. Using tongs (not burnable fingers, we don't want a trip to A+E) take out the bacon and place on a greased plate (you can just use the plate that the bacon cooled on as that will be pretty greasy). If you want them to dry in a certain shape, bend them in to that now.

10. Whilst the bacon sets, bung all the frosting ingredients in a bowl and mix with the electric mixer. Add more icing sugar/bourbon as required. Load said frosting in to a piping bag (you can just put dollops on top with a spoon if you prefer) and pipe the frosting on to the cakes. Then top with the bacon, pour yourself a large measure (over ice) and congratulate yourself like all your fucking mates are going to when they see how clever you've been. No need to thank me, I drink so much that I'll have forgotten your name before you've even finished introducing yourself, let alone said thanks (however you CAN comment below for posterity).

NB - As I had said before, I enjoy booze in my food as it prolongs the haze in which life is bearable and other people almost acceptable. Because the booze isn't cooked off here, you want to use the best quality you can afford as you're going to taste it. I'm not going wax lyrical about Woodford as I've done that before - but seriously it's an amazing bourbon and it gives these cupcakes a caramel/vanilla/toffee/spicy touch that you don't get elsewhere.


Monday, 25 March 2013

Competition time! Cake and Bake Show Manchester Tickets!

There are many smells I enjoy and most of them involve food - garlic and onions softening, broad beans flowers on a hot morning, my fingertips green and fragrant from torn basil; but nothing beats that warm, homely, sweet smell of a baking cake.

I've been experimenting with cake flavours lately - I'm not a lover of sweet cakes; those oozingly, cheek-achingly, filing-creating clouds of fluffiness smothered in buttercream, dripping white chocolate and iced within an inch of their life - in order to not just keep knocking out lemon drizzle cakes and boring the socks off my friends.

This cake is light and perfumed, the flavours barely there, just the odd floral note tripping across the tongue. I'm pretty proud of it and those nice people at the Cake and Bake show are proud of me inventing new cake recipes so have given me TWO TICKETS to Manchester's Cake and Bake Show (which runs April 5-7 - more info HERE) to give to you happy readers.

So read my recipe and then, to be in a chance with winning, comment on the blog or send me a tweet @northwestnosh with the title of your favourite/most unusual cake recipe (no need to post the whole recipe) - the most creative/yummy sounding wins. IT'S THAT EASY! Comp closes Fri 29th March - good luck!


Gluten free Rosewater and Orange cake

Rosewater and orange cake (nb this is an orange and not a rose icing, hence the colour!)

Ingredients

3 large free range eggs, at room temperature - separated
160g unrefined caster sugar
80ml light olive oil (not heavy or EV as it will cover the flavour of the cake)
50ml rosewater
Zest and juice of half an orange
Pinch of Doves Farm baking powder (this is gluten free)
Pinch of salt

Once the cake is cooked

50ml rosewater

For the buttercream

100g unsalted butter, at room temperature
200g icing sugar
1-2 tblsp rosewater

For the icing

125g icing sugar
1 tblsp rosewater
Red food colouring

1. Preheat the oven to 180c (fan) and grease/line an 18cm cake tin

2. Beat the egg whites to peaks and set aside.

3. In a separate bowl add the sugar and beat in one egg yolk at a time on the lowest whisk setting. Once all the eggs are in, work through the whisk setting, spending about a minute at each speed, the mix will go pale and creamy. It may seem long-winded but the whole idea is to get as MUCH air as possible in your cake as gluten free flour doesn't rise in the same way and can be pretty flat.

4. Pop the orange zest in the bowl and then start your whisk on slow - whilst it's running drizzle in the oil, followed by the orange juice and the rosewater. As in step 3, work through your whisk's settings.

5. Add the flour, salt and baking powder to the bowl and fold in - I tend to do this in two separate amounts to make it easier. Be as gentle as you can to keep all that precious air in. I would advise against eating the batter right now - gluten free flour is pretty grainy and it tastes a bit like sand; DELICIOUS.

6. Add the egg whites is three separate amounts and fold in gentle gentle with a spatula or metal spoon (wood will knock the air out). Make sure you ensure it's properly incorporated otherwise you will get rubbery white bits throughout the cake.

7. Pour the mixture in to your tin, it will be wetter than a normal cake batter, but this is normal - then pop it in the oven for 35-40 min. It's ready when a skewer can be inserted and comes out clean.

8. Take the cake out and let it rest in the tin for five minutes, then take the cake out of the tin but leave it in it's paper and leave to cool on a rack.

9. Whilst the cake is cooling, make the buttercream by putting the butter in a bowl and whisking till light. Add in the icing sugar and beat again. The add the rosewater and, you got it, beat again. Give the butterceam a taste and add more sugar/rosewater as needed. This recipe makes slightly more than you will need so you can eat a big spoon of it when no one is looking (if you want to cover the whole cake in buttercream, then just double the recipe, it works, I've done it).

10. Once the cake is pretty cool, slice in half and drizzle each cut side with the rosewater and then sandwich the cake together with the buttercream and set aside whilst you make the icing.

11. To make the icing put the icing sugar in a bowl and add the rosewater a little at a time until the mix coats the back of a spoon, add a tiny drop of red colouring to make a light pink colour. Really it's that's easy. Leave to thicken for a few minutes and then pour over the cake and garnish with a rose petal if you have one.

12. Serve with a cup of fragrant earl grey or chai tea and eat in a summery garden, or (in reality) the warmth of the kitchen!


Thursday, 31 January 2013

Tomato, meatball and fennel pasta recipe

This is one of those recipes  that you can whip up pretty quickly and it looks like you've spent a good old bit of time in the kitchen carefully blending ingredients to make something hearty and warming. If you're a bit of a cad you can reinforce the lie by listing off a long list of ingredients you obviously used and leaving herb jars out on the side, or you can just 'fess up and have people gasp at your kitchen ingenuity - I mean, Nigella's made a career from cutting corners, so why can't you?

Easy balls...

The meatballs in this recipe need to be top notch, so buy the best sausages you can afford and make sure they have a high meat content - you can afford to pay a bit more as the sausages stretch quite far prepared in this way. Go for free range/organic, as at least you know the piggies have had a good life before being mercilessly slaughtered for you the benefit of your tummy - after all, pigs are more intelligent than dogs and suffer shamefully in an intensive system (enough preaching now).

As expressed in previous blog posts, I can't survive without tomatoes, so when my ethical wranglings are too much for me to buy imported fresh ones, I satisfy my cravings at this time of year with tons of tinned toms.

I'm a little obsessed with fennel at the moment, but it's the one thing that makes this everyday dish a little unusual, leaving people puzzling to put their finger on what that floral, aniseedy backnote is. Including the fennel lightens the dish and means you can pair this with a mouthy white as well as a lighter red. Or both, if you want to drink that much...

Tomato, Meatball and Fennel Pasta

Serves two - Prep 10 min - Cook 25 min


Ingredients

 - 4 high meat content free range/organic sausages
 - 1 tsp of fennel seeds
 - 1 smallish onion, finely chopped
 - 2 cloves of garlic, finely sliced
 - 1/2 red pepper, finely diced
 - 100g mushrooms, finely sliced
 - 1 tsp tomato puree
 - 1 x 400g chopped tomatoes
 - Salt and freshly ground pepper
 - 1/2 tsp sugar
 - Olive oil for cooking
 - 150g pasta of your choice

Method

1. Make sure your sausages are at room temp. Taking each sausage one at a time, squeeze out the sausage meat from the casing in three separate amounts; squeeze each bit of the sausage in to a small ball. Repeat with eat sausage.

2. Put a pan on to medium high heat and once hot fry the sausage balls until brown on the outside, but not cooked all the way through - you won't need to add any oil to the pan as enough will come out of the sausages. You'll need to fry the balls in batches, to make sure they fry and don't just steam. Remove from the pan and set aside.

Browned balls

3. Turn the heat down and in the same pan (don't wipe it out!) add the the fennel seeds and cook for  30 seconds until they become fragrant; then soften the onions and after three minutes, add the garlic and soften - keep stirring/turn heat down to make sure these don't catch or they will introduce a bitter note to the dish.

4. Once the garlic and onion has softened, add the pepper and the mushrooms and cook for a couple of minutes until they start to soften.

5. Add the tomato puree and the tomatoes, turn the heat up and add the sausage balls to the pan. Keep this blipping away on a medium heat as you boil a kettle for the pasta.

6. Put the water in a large pan, salt it and once to comes to a rolling boil, add the pasta and cook to the instructions.

7. Whist the pasts is cooking, check the seasoning on the sauce and keep it blipping away. Sometimes I add a dash of worcester sauce if I feel lacks a bit of flavour.

8. Drain the pasta, plate and add the sauce on top to raptuous applause (whilst you hide the sausage packet!).

NB thism sauce can also be used as a filling for lasgne, to have with potatoes, to accompany veg etc etc - it's not just for pasta!


Wednesday, 16 January 2013

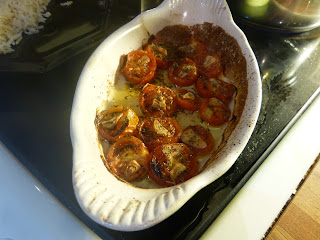
Easy roasted cherry tomato recipe

As promised in previous posts, here’s the recipe for the easy roasted tomatoes. They’re pretty easy to make, so don’t go thinking I’m such a kitchen don for figuring this out.


I’ve lately found myself in the position that I’m now cooking for one – after a couple of months of living off a diet of booze, miso soup and any cake that was brought in to the office (which saw me subsequently becoming anaemic and submitting to any cold/sickness that reared its head), I’m now back forcing myself to actually bother to cook when I get in from work and to cook food that tastes great/puts nutrients in to my body.

Walking round the supermarket, I’m wracked by environmental concern as I look at prettily packaged tomatoes bursting out of the temperature controlled fresh produce isles in the middle of winter – however tomatoes are my weakness and I can JUST survive the mountain of guilt as I pluck the most overly packaged ones off the shelf and stash them in my basket, whilst furtively making sure none of my environmental charity colleagues are ready to jump out from the root vegetables and question my sustainable ethics. So yeah, that's why I'm posting this now and not in August.

I like to use the little plum cherry tomatoes, but you can use any type you fancy. If you’re arsed about that sort of thing or want to really impress those people you regret inviting round to dinner, then you can get a selection of sizes and colours. Or if you live near a poncy market and not in the provinces then get your hands on some heritage ones and harp on about it on Twitter so everyone knows what a fucking foodie you are.

For the above mentioned reasons, I’ve given you a recipe for one portion, but it’s pretty easy to scale up for as many people as you want – just make sure you use a bigger dish and make sure the tomatoes are all in one layer. This is a side dish portion, or will stir through pasta for one, if you want to make it the main event in a dish, I'd scale things up 50%.

Quick roasted tomatoes


Serves one – prep 2 mins – cook 30 mins

Ingredients


• Ten cherry tomatoes, halved

• 1 clove of garlic, finely sliced

• Pinch of salt

• Grind of black pepper

• 1/4 tsp of thyme – dried will do

• Cooking olive oil


Method


1. Turn your oven to 180c (fan).

2. Wash and halve your tomatoes.

3. Place the tomatoes in an oven-proof dish – make sure you choose one that the tomatoes can fit in one layer in, but that doesn’t leave too much room around them. A small pyrex or ceramic dish can be picked up at Big Shop for a couple of quid and will come in handy for lots of lonely, one person meals in the future (cue small violin please...).

4. Lay your garlic slices on top of the tomatoes. Sprinkle over the salt, pepper and thyme and drizzle over a bit of olive oil – you don’t want to drown it, just a drizzle to stop the garlic burning.

5. Place in the oven for about thirty minutes – check after twenty to see how it’s fairing – ovens (especially old ones I don’t have the money or motivation to change) can be contrary beasts, so I can tell you 30 minutes and I know you’ll come back to me and gripe that it took 37.2 minutes, that's why I get you to check them. The tomatoes should be soft and just catching, but not burnt or hard.

6. Take out your tomatoes and have them as a nice side or stirred through pasta or however your creative brain/tastebuds direct you. If you’re lazy and want me to suggest a whole meal to you (and it’s a chance for some shameless self promotion), then eat these with slow cooked baked beans and sticky chipotle bourbon chicken. Oh and some steamed broccoli, because it stops you getting folate anaemia and I’m well up on that now.

Looks a bit minging, tastes a lot fab


Monday, 7 January 2013

Sticky chipotle bourbon chicken recipe

I’m putting my hands up and admitting to being a bit of a chilli freak – not one of those masochistic show-offs who punish their taste buds/guts/sweat glands by seeing just how hot I can take things; instead I'm rather relaxed, enjoying the subtle flavours found in different types of chillies and delighting in a little overall heat, rather than requiring a tongue made of asbestos to even attempt getting close to the food I cook.

Lately, my obsession has focused on the dried, smoky, fruity chillies so redolent of Mexican cookery; think anchos, chipotles, guajillos – with access to great online stockists such as Spice Mountain, Panchos in the Arndale Market and even my local, provincial supermarket getting in on the act; I’ve had lots of opportunity to sate my chilli fix.

This following recipe is a favourite of cold days when I need a little warming comfort – the chicken goes really well with steamed greens, brown rice, jacket potatoes, home baked beans (recipe here), sweetcorn, a big glass of bourbon on the rocks… But I’ll let you find your own perfect pairing and not be overly prescriptive in what you should be eating this with.

Perfect drinks match to the chicken - also, in the chicken!

NB I use chicken on the bone as it has much more taste than breast; plus the extra fat lends itself to surviving the heat of the oven. You could use breast here, but reduce the cooking time as needed.


Sticky chipotle bourbon chicken


Serves 2 – Prep 5 min – Marinating – 20 mins plus – cooking time 30-40 minutes


Ingredients

• 4 pieces of chicken, thighs and drums (up the quantities for the marinade if you are using more pieces) – I always use free range organic chicken; it tastes better, it’s better for the environment and I like to know the things I’m eating have at least had a sort of good life before they get killed for my plate

• 100 ml cooking olive oil

• Big grinding of black pepper

• 1 heaped tsp chipotle paste (use less/more to vary the spice levels to your liking)

• Good shake of Worcestershire sauce

• 2 tblsp honey – use runny if you have it, I just used up some crystallised set honey as I wasn’t going to use it on toast, once it was in the oil it was fine

• 1 tsp dried thyme

• 50ml bourbon – I used Woodford, but you can use something Jack Daniels or something similar

• Sea salt


Method

1. Bring the chicken out of the fridge and up to room temperature before you use it (about 30 mins) – you should do this with every meat you cook with to ensure it cooks properly.

2. Put all the ingredients bar the chicken and the salt in a bowl big enough to accommodate the chicken and mix to make your marinade. Taste to see if it’s spicy/sweet enough for your tastes - always taste BEFORE you add the chicken and NEVER taste a marinade which has had raw meat in. Remember that it will have no salt in, but don’t add any now.

3. Put the chicken in the marinade bowl one by one. As you put each piece in, rub the marinade into every nook and cranny of the chicken, I like to rub it under the skin, so that all the chicken meat gets flavoured.

Marinade all rubbed in

4. Once all the chicken is in the bowl, wash your hands as they are covered in raw chicken. Put the bowl to one side on the work top and cover it with cling film, leave for a minimum of 20 mins (max marinating time should be over night/a day). If you are going to leave it for more than 30 mins, put the bowl in the fridge. When you take it back out of the fridge, make sure you bring the meat up to room temperature before you cook it.

5. When you are ready to cook the chicken, heat the oven to 200c. Place the chicken thighs skin side down in a roasting tin/dish (the dish should just accommodate the chicken pieces, without leaving too much space or ramming them in too tightly). It doesn’t matter how you place the drumsticks as they have skin all the way round.

6. Sprinkle over a little sea salt and place in the oven for 25 mins.

7. After 25 mins turn all the chicken pieces over (thighs skin side up) and sprinkle with a little more salt – check to see how done they are and how long more they will need.

8. After 35 mins check to see if they are cooked through and serve when they are ready. To serve take the chicken pieces out of the dish and put on plates with sides of your choice. Drizzle the chicken with the sticky, smoky, spicy juices from the bottom of the roasting dish as they are delicious ad shouldn't be wasted!

Sticky, spicy and ready for eating


Saturday, 5 January 2013

Slow cooked homeamde 'baked' beans recipe

At this time of year, our thoughts collectively reflect on the gluttony of the Christmas period; so much recipe and food writing at this time of year implores us to drop the dress sizes we’ve (so hideously, like the awful, unrestrained plebians we are) piled on, by detoxing/cutting out/practically starving ourselves back in to the svelte creatures we weren't pre-Christmas. To these writers/articles I say, "shut up."

A recipe post is no place for me to espouse my thoughts on faddy, cut-out diets (seriously you just need to eat less/move more – but that’s a rant for another day...); but I will ask you, how sustainable is something when you starve your body of essential nutrients? Even if for a relatively small period of time?

...anyway, before I get started... This recipe represents my approach to post-Christmas food; focussing on being healthy and restrained, whilst still being big on flavour, comfort and most essentially - including the essentials of a healthy diet.

This recipe won't make you lose 7lbs in a week, but it will nourish you and when conjoiuned with other healthy recipes and a bit more movement (even ten minutes pace around the block), will help you  lose your Christmas belly sustainably; without turning you in to a sugar craving, secretly binging, demented, calorie counting, label checking grump.

With this recipe you don't need to cut everything out of your diet - especially taste!

NB I have used dried beans in this recipe – it is always imperative that you prepare dried beans according to the packet instructions and never add them to recipes dried. Some beans, especially kidney beans, can be very dangerous if not prepared properly. You can use canned beans, but it does make for a more mushy consistency.


Slow cooked ‘baked’ BBQ beans


Serves 10 as a side/starter or 6 as a main – prep 15 min plus overnight soaking/boiling – cook time 7 hours (in slow cooker)

Ingredients

• 300g dried cannellini beans – prepared to the packet instructions (usually overnight soaking with 10 mins boiling, but please check)

• 300g dried kidney beans – prepared to the packet instructions

NB – you can substitute 4-5 x 400g cans of beans instead – just make sure you use ones that don’t have any extra sugar or salt. Feel free to use a mix of any beans, these are just ones I had in the house.

• 1 dried guajillo chilli – could use dried ancho or other dried, smokey chillies instead

• 100ml boiling water

• 2 x cans chopped or plum tomatoes – if using plum, make sure you break them up

• 1 tsp chipotle powder (can use 1 tsp chipotle paste instead)

• 1 tsp english mustard powder

• ¼ tsp cloves

• 1 tsp smoked sweet paprika

• 1 tsp dried thyme

• 2 tblsp molasses sugar

• 1 tblsp treacle

• 1 tblsp red wine vinegar

• Good grinding of black pepper

• 6 bay leaves

• 1 x large onion, sliced fine

• 400g smoked bacon in one piece – cubed – or smoked belly pork (I just used the bacon) - you can leave this out if you are veggie

• Sea salt, to taste


Method

1. Prepare the beans to the packet instructions – when they are ready, rinse them and set aside.

2. Toast the dried chilli in a dry frying pan for a minute or two, until just smoking, but not burning. Whilst it is toasting, boil a kettle.

3. When the chilli is toasted, take off the stalk and remove the seeds (or leave in if you want spicy beans!). Place the chilli in a small bowl (you may need to rip it in half) and add 100ml boiling water. Leave it to rehydrate for 10 mins, whilst you make the sauce for the beans and layer everything together.

4. In a bowl add all the ingredients together; bar the bay leaves, onion, bacon and salt. Mix until a smooth consistency.

5. In the bowl of your slow cooker, put a third of the cubed bacon (use the fattiest bits for the bottom layer), then follow with a third of the onion and two bay leaves. On top of this add a quarter of the beans.

Layer it up


6. Repeat the layers, finishing off with a layer of beans – make sure they are under the top of the pot.

7. Pour the water the chilli has been rehydrating in, into the reserved tomato mixture. Chop the rehydrated chilli as small as you can (treat it like chopping fresh herbs) and add to the tomato mixture – stir in.

8. On top of your layers, add the tomato mixture – using the handle of a wooden spoon to poke through the layers and help it seep through. If the tomato mixture comes to way below the level of the beans (more than 2cm), add a little water to the pot.

9. Put the lid on and put the slow cooker on the low setting, (I only have Low and High on mine). Cook for six hours and check the seasoning. Add sugar/salt/vinegar/spice to your own personal taste. For mine I added ½ tsp of salt and a capful of extra vinegar – but always taste before and after you do this.


10. At this point check to see how done your beans are – beans will cook quicker the fresher they are, however there is no way to tell how old the beans in the packs you buy from the shops are, so you need to check on this recipe from about hour six onwards. Mine ended up taking seven, but another time has taken as long as eight.

11. Serve with whole brown rice and some quick roasted tomatoes (recipe to follow). Or if you’re pushing the boat out, with a baked potato, sweet corn and sticky chipotle chicken (recipe to follow). Streamed broccoli also suits this very well.

Not the best looking dish, but one of the most tastiest!


Ps – these beans taste nicer the next day, great for a nutritious, tasty and filling lunch that will make you the envy of the whole office!

NB – I bought my chipotle powder and dried guajillo chilli from Spice Mountain at Borough Market, but they also trade online. Chipotle powder is an amazing spice cupboard addition, however you can used two dried chipotle (prep the same as the other dried chilli) or a tsp of chipotle paste (available from big supermarkets) instead.

NB – You don’t have to use guajillo chillies here, you could use ancho (available in the speciality section of big Tesco’s) or other dried, smoky, fruity chillies you come across. Vary the chillies for different flavours or add a selection of your favourite to vary the flavour to your liking. You can buy dried chillies online at Spice Mountain, Steenburgs and Cool Chile Co.

Sunday, 30 December 2012

Chorizo, kale and mushroom pasta

After a Christmas comprised of sheer gluttony and wild food adandon, my thoughts have turned, true girl style, to my waist and those flabby bits that have appeared on my upper arms, which are commonly known as 'bingo wings' - with that in mind my post Christmas eating has become somewhat restrained, hence the inspiration for the following recipe.

Packed with kale and mushrooms it's full of much needed nutrients like essential B vitamins, which, coupled with the garlic/onions are great for your immune and circulatory system (both which could do with a massive boost at this time of year); the wholewheat pasta keeps you fuller for longer and contains fibre to 'ahem' deal with the meat overload that's rotting in your gut and the sprinkling of chorizo/parmesan adds extra flavour and a feeling of indulgence without too many extra calories/sat fats - but if you're being super keen, just leave these last two out.

I'm using mafalda corta as the pasta here - it's not the best for this type of dish, but a) I had it in and b) I really like how it looks/feels - the philosophy behind this restrained eating is to make it as pleasurable as possible, so you don't feel like you're cutting back (when you most certainly are). In this recipe use the very best you can afford, therefore packing a full flavoured punch to keep your mid-winter post-Christmas-restraint-blues eating interesting.

Chorizo, kale and mushroom pasta

serves two - prep five min - cooking 15 min


Ingredients

 - 75g chorizo (not cooking chorizo though you can use it here if you prefer), cubed - try and find an iberico bellota ring, it's more expensive, but tastes much better and the meat is much higher quality
 - 1 small onion, finely diced
 - 150g wholewheat pasta, I used mafalda corta, but feel free to use any wholewheat pasta you like - I would say use a good quality brand like Napolina as some basic lines of wholewheat pasta are very worthy/soggy/awful
 - 2 cloves of garlic, finely sliced
 - 1 pack of cavolo nero (about 150g), rinsed - can use normal kale, but cavolo has a better flavour/texture
 - 2 portobello/large chestnut mushrooms, sliced
 - extra virgin olive oil
 - sea salt and freshly ground black pepper
 - parmesan, to garnish
 - cooking olive oil as/if needed


Method

1. Put a frying pan on a medium heat and immediately add the chopped chorizo - adding it to a cold pan and letting it heat up with the it will cause the paprika spiced oils to melt out in to the pan, adding loads of flavour. Put a full kettle on to boil.

2. Once the oil has come out a little, add the onions and cook until soft. After a three minutes or so, add the garlic and keep stirring every now and again to stop the onions/garlic catching - you may need to add a splash of cooking olive oil if not much is coming out of your chorizo (it's a natural product, so each one varies). Whilst the onions and garlic are softening, put the boiled water in a large pan and add a generous pinch of salt.

3. As the water reaches a rolling boil (ie very fast and bubbly), add the pasta and stir to stop it sticking on the bottom - make sure you keep the pasta on a fast boil and stir every now and again. Cook to the packet instructions, but a minute or two before the end of the cooking time, test to see how done it is - you want it al dente (slight bite).

4. Whilst the pasta is cooking, cut the mid-ribs out of the cavelo nero and slice finely - add these to the frying pan. Keep stirring to stop the onions/garlic sticking. Cut the leafy bits of the kale in to fine ribbons and set aside.

5. After a minute, add the mushrooms to the frying pan - mushrooms absorb all the tasty juices, but also make the pan very dry when they are first added, so you may need another splash of cooking olive oil, just to stop the onions/garlic catching.

6. In the last three minutes of the pasta cooking, add the reserved kale leaves to the pasta water and cook with the pasta.

7. Drain the pasta/kale in a colander and add back to the cooking pan (minus the water). Keep the pan off the heat and dress the pasta with a sprinkle of sea salt, a good grinding of pepper and a drizzle of extra virgin olive oil. Add the contents of the frying pan and stir through the pasta.

8. Divide between two bowls, check the seasoning and grate over some parmesan - if you use a fine microplane, you'll use a lot less cheese and it will be more of a seasoning than a fattening additive (which is the idea here).

9. Enjoy your healthy food, without cutting back on taste or essential nutrients. Bon appetit.

Ps The meat and cheese in this recipe are merely seasonings and not the main components of the dish, so if the amount of these looks small in relation to the pasta/veg, that's how it's meant to look!

NB this recipe is also on the cheap side, great for restrained wallets as well as restrained diets.


Wednesday, 5 December 2012

Chocolate, Cherry and Almond Bread Pudding Recipe - Booths Cheers Secret Mission

If someone sends you some free booze with a ‘Secret Mission’ envelope strapped to it, what do you imagine is in there? Booze related nudity? Tequila based humiliation? A night in the cells/hugging the porcelain/day off work?

For the last few weeks I've been joining Booths (that wonderful Northern 'grocery store' and purveyors of fantastic produce) and other bloggers on Twitter to taste and discuss booze selected for us by Booths. It's been a fun way to meet new people, up my wine tasting skills and makes me feel like I'm not really drinking alone in my house mid-week (I'm with Twitter people, it's not alone!). This week Booths threw down the gauntlet and sent us bloggers a secret mission as well as the usual booze consignment.

Where all the cool kids have been hanging out!
The booze in question was a bottle of Crofts Indulgence Reserve Port and the secret mission was to create the ultimate comfort food to match it. Oh and to top it, for this mission I’d be pitting my creation against a recipe devised by Linzi from Lancashire Food. A competition? Competing? Going head to head? How could I say no to this? (Please don’t ever attempt to take me to a pub quiz or play board games with me, you have been warned).

I got the old grey matter working and, in the name of pure gastronomic/recipe research, got out the port glasses (ok, Moomin water glasses) and got my tastebuds on the case too – team effort, well done body! This port has a big berry nose and this translates down to the mouth; I was getting plums, cherries and currants with a bit of a chocolate note – little thinner than an LBV, but actually very good considering this is about half the price of an LBV!


The booze we're drinking this week - my picture was rubbish, Booths very kindly took a good one!

Initial thoughts were to run with the whole stilton, port and nuts thing – very classic, very Christmassy, very comforting and some big flavours to match the port. However, that chocolate back note got me thinking – I like to sup port in the evening, or after dinner, often after pudding AND I LOVE CHOCOLATE. How about I make a big comforting pudding that would match perfectly with the port? Shazam! An idea formed… (and then I went in to the kitchen, made it, ate it as soon as it came out of the oven and have subsequently received third degree burns in my mouth for my effort in bringing you amazingness. I am such a martyr for my art...).


Chocolate, cherry and almond bread pudding –

Serves 6 – 30 min prep, 30 min stand, 30 min cook


(Please note, I made this as a 2 person and scaled up, however I have made the recipe for plain old chocolate bread and butter pudding from this recipe before, so know it works for 6. It’s a tinkering of a Delia recipe I based my plain choc one on, which I now use all the time – good old Delia!)

Ingredients


• 9 slices of day old white bread, crusts removed, cut into triangles (the white sliced loaf from the supermarket bakery works well, the pappy packet stuff just tends to disintegrate)

• 250g dark chocolate

• 75g butter, unsalted – plus extra for buttering the bread/dish

• 425ml whipping cream

• 4 tbsp amaretto – or a few drop of almond essence if you want to omit the alcohol

• 110g caster sugar

• 3 large eggs

• Half a jar of pitted morello cherries in syrup, drained and cut in half

• 100g whole almonds

• Cream or custard to serve

• Shallow 18x23cm dish (mine's a few cms off this and it still works well)

Method


1. Lightly butter the inside of the dish and each side of the bread.

2. If you are naughty like me – put the butter, cream, 150g chocolate and sugar in a pan on the LOWEST heat possible and melt them together. Stir when you see the chocolate and butter melting so the chocolate doesn’t burn. Take off the heat and stir all the ingredients together and then stir in the amaretto.

3. If you are a good girl then put the sugar, butter, amaretto, 150g chocolate and cream in a bowl over a pan of barely simmering water and don’t let the bowl touch the water. Take off when melted and stir to combine.

4. In a big, separate bowl whisk the eggs. Pour the chocolate mixture over the eggs, whisking as you go.

5. Put a 1cm layer of the chocolate mix in the bottom of the dish and then add a layer of bread triangles overlapping each other (use half your bread triangles for this). Pour over half the chocolate mix and use a fork or spoon to press it in to the bread and make sure every slice has a covering of chocolate custard.

6. Dot the reserved 100g of chocolate and the cherry halves all over this layer in a random pattern (or you can do it in exact lines if you have pattern OCD like me).

7. Add the remaining bread in overlapping layers and then spoon the remaining chocolate sauce over – again pressing and making sure each bread piece is covered in the sauce.

8. Cover with cling film and leave to stand for 30 mins on the work top or in the fridge. Whilst it is setting turn the oven on to 180c to warm up.

9. Take off the cling film and put the pudding in the oven for about 30 mins, it should be a bit crispy on the top and squidgy in the middle. Check after about 20 mins as the chocolate can sometimes burn and no one likes that taste! If it is catching, cover with a layer of tin foil/baking paper until it is ready.

10. Whilst the pudding is in the oven, put a heavy based frying pan on a medium heat. Once it is hot, add the almonds and toast till they are brown. Keep an eye on the as the oils in them can catch easily – you want them to be a nice golden brown. (You can do this in the oven at the same time as the pudding if you need to hob for other things; I just like keeping an eye on them on the hob).

11. Chop the almonds till they are slightly fine, but still with a bit of texture – you don’t want sand! Take the pudding out and dress with the almonds.

12. Serve warm with custard, cream or ice cream and a good measure of port.

Monday, 1 October 2012

Old Fashioned Cake (gluten free) - Whiskey and Orange and BOOM

What's this? Another recipe from me? What have become a recluse and stopped writing about going out and stuffing things in my face? No I just got on a recipe kick this week and I've been blasting huge amounts of bourbon in to things and bloody enjoying it - so thought you would too. And it's my blog, so I can write what I want, can't I?

"What's an Old Fashioned cake," I hear you cry? It's not a dusty tea loaf from your spinster aunt's kitchen, full of cat hair and ten year old raisins; no, this cake has been inspired by my very favourite cocktail - an Old Fashioned - basically bourbon whiskey, sugar syrup and orange peel; smoky, sweet, short and a little perfume kick, delicious really.

So enough waffling as this cake recipe is super scrumptious and amazing (like me) and you should all rush out and make it now. Plus it's like the pancakes, it's legitimising booze DURING THE DAY - and most of the booze in this one isn't cooked, so you get a lovely warm kick of it with each and every slice.

And yes, I'm using Woodford again - the booze isn't cooked off here, so I wanted the cake to taste of something nice rather than that £8 crap from Aldi. This is a gluten free cake - but just replace the GF flour with normal self-raising and congratulate yourself on being about to metabolise this protein.


Nosh's Old Fashioned Cake - or Whiskey and Orange Cake

Ingredients
3 large free range eggs, at room temperature - separated
160g unrefined caster sugar
80ml light olive oil (not heavy or EV as it will make the cake taste ming)
25ml Woodford or other bourbon/whiskey
Juice of one and a half oranges
Zest of two oranges
190g Doves Farm gluten free self raising flour
Pinch of Doves Farm baking powder (this is gluten free)
Pinch of salt

Once the cake is cooked
Juice of half an orange
50 ml Woodford/bourbon/whiskey

For the buttercream
100g unsalted butter, at room temperature
200g icing sugar
1-2 tblsp Woodford/bourbon/whiskey

For the icing
125g icing sugar
1 tblsp Woodford

1. Preheat the oven to 180c (fan) and grease/line an 18cm cake tin

2. Beat the egg whites to peaks and set aside.

3. In a separate bowl add the sugar and beat in one egg yolk at a time on the lowest whisk setting. Once all the eggs are in, work through the whisk setting, spending about a minute at each speed. Will go pale and creamy. It may seem a blag but the whole idea is to get as MUCH air as possible in your cake as gluten free flour doesn't rise in the same way and can be pretty flat.

4. Pop the orange zest in the bowl and then start your whisk on slow - whilst it's running drizzle in the oil, followed by the orange juice and the bourbon. As in step 3, work through your whisk's settings.

5. Add the flour, salt and baking powder to the bowl and fold in - I tend to do this in two separate amounts to make it easier. Be as gentle as you can to keep all that precious air in. I would advise against eating the batter right now - gluten free flour is pretty grainy and it tastes a bit land sand; DELICIOUS.

6. Add the egg whites is three separate amounts and fold in gentle gentle with a spatula or metal spoon (wood will knock the air out). Make sure you ensure it's properly incorporated otherwise you get random rubbery white bits throughout the cake.

7. Pour the mixture in to your tin, it will be wetter than a normal cake batter, but this is normal - then pop it in the oven for 35-40 min. It's ready when you do the whole clean skewer test thing.

8. Whilst the cake is cooking; get the ice out of the freezer, pop four cubes in a whiskey glass and pour yourself a large measure. Relax, you're half way through and no one is home for the next two hours.

9. As the cake is baking you can be a super goody two shoes and wash up, plus it's a brilliant time to make the butter cream, or you can just carry on drinking if you like.

10. For the buttercream, put the butter in a bowl and use your electric whisk to beat till light. Add in the icing sugar and beat again. The add the bourbon and, you got it, beat again. Keeping it simple for this part as I'm not sure how large that measure was you just poured yourself. Give the butterceam a taste and add more sugar/bourbon as needed. This recipe makes slightly more than you will need so you can eat a big spoon of it when no one is looking (if you want to cover the whole cake in buttercream, then just double the recipe, it works, I've done it).

11. Take the cake out and let it rest in the tin for five minute - be careful because it's hot - you may feel invincible from your post-baking drinking, but singed finger are not good. After five minutes, take the cake out of the tin but leave it in it's paper and leave to cool on a rack.

12. Once the cake is pretty cool, slice in half and drizzle one cut side with the juice of half an orange and the other with whiskey. Sandwich the cake together and set aside whilst you pour yourself another/make the icing.

13. To make the icing put the icing sugar in a bowl and add the whiskey a little at a time until the mix coats the back of a spoon. Really it's that's easy. Leave to thicken for a few minutes and then pour over the cake and garnish with a twist of orange peel.

14. Congratulate by pouring yourself a Woodford and tucking in to a healthy slice before anyone comes home and finds you slumped over the cooker with no dinner on and cake crumbs round your mouth.

If you want to serve this with the cocktail that inspired it get a whiskey glass (or an old fashioned one, it actually has a certain glass!), add ice, a few drops of bitters, 1 tsp sugar syrup/gomme and 50ml of bourbon - I'd go with Woodford, but the according to the Woodford/Jack ambassador a Jack Daniels Single Barrel is better as it's less heavy on the rye. However you drink it, ENJOY!

By the way, as I've said before, the content on this blog and then recipes are my own that i have slavishly worked on to make work - especially with this bastard of a cake. If you would like to reproduce it then do ask and I'm sure I won't hesitate to say yes as long as there's links/references/sexual favours for me. If you do reproduce without my permission then I will lift myself off the cooker, wade through the Woodford fog and probably do something I will regret in the morning. Thanks.

Monday, 24 September 2012

BBBadass Breakfast - Bourbon Banana Bacon Pancakes Recipe

What's this? A recipe with booze in it? Yeah I like drinking in the morning and am always looking for excuses. Plus I just got introduced to bourbon by The Liquorists and T.Vernon and guess what? I'm putting it in everything like the rebel/teenage girl with a crush, because I'm a grown up and I can.


*swoons*

This recipe tastes amazing (I would say that), is super comforting and gives you an excuse to a) have alcohol in your breakfast and b) drink the said alcohol whilst cooking, for quality control/fuck yeah reasons. So if you've had a heavy night, are semi-alcoholic, or are having to get through a breakfast with with children, then knock this easy recipe up 'cos it's way more classy than sucking the dregs out last night's wine glasses/bar towels/your shirt.

It's pretty easy to bang out, but if you're anticipating something epic the night before then you can make up the batter and leave it in the fridge - it'll keep for a few days like that; you might just need to add a splash of milk to get it to the right consistency - and if you're drinking/eating alone, then you have batter for a few days - win.
This is what you are giong to make and then the world will be ok

This recipe calls for bourbon, you can either leave it out (er, what? The whole point of this breakfast is to revel in spirits and keep the party going) or replace it with a single malt or even another spirit. If you do, you won't get the same toffee caramel sweetness with a smokey hint of vanilla, that a bourbon brings to the mix - but it's up to you and I'm no food nazi (btw dark rum works amazingly here).

Btw I'm using Woodford in the recipe - mainly because I can and I don't live by the 'don't put expensive booze in food' rules; not because I'm rich/exclusive/up my own arse dahlink, but because I have this in the cupboard and can't be arsed getting a cheap bottle in. Woodford does give the recipe a mellow spicy edge that I've not found before and it is my FAVOURITE bourbon that I can actually afford - but yeah, go get the £8 bottle from Aldi if you're going to make this constantly (TIP: the £8 Aldi bourbon is great for cooking/punches) .

Oh and using Woodford means I don't have to get two bottles out and can just drink/cook with the same one - IMPORTANT if it hurts to even consider breakfast, let alone make it.

Ingredients in visual form - may help when it hurts to read

BBBadass Breakfast - Bourbon Banana Bacon Pancakes
Serves 2 - prep 5 min - cooking 15 min

For the pancakes
125g self-raising flour
1/2 tsp baking powder
Pinch of sea salt
1 tsp ground cinnamon
10g golden caster sugar
1 large egg (free-range please)
150ml milk - but you won't need all of it
20g melted butter

For the syrup
50g butter
4 tbsp soft brown sugar
4 tbsp granulated sugar
150ml bourbon - I used Woodford, but you can use whatever you want (you might need more to thin out/taste)

You will also need
Two bananas - cut in half length ways
Four rashers of smoky bacon

1. Get some ice out of the freezer, get a nice glass and pour yourself a large measure - this will make you feel like golden syrup and make the rest of the day seem ok.

2. Pre-heat the grill on medium, put a frying on a low heat and add the butter.

3. Put all the dry ingredients to a bowl and make a well in the centre. Break the egg in to the well and then add about half the milk. Using a balloon whisk, whisk the mixture gently (so as not to hurt your head more/spill your drink) and then add more milk, whisking all the time until you get a consistency of slightly thicker double cream (so you may not need all the milk, I usually have a little left over).

4. By the time you have made the batter the butter should have melted. Add this to the batter and give it a stir. Set to one side for the time being. You may need another drink at this point.

5. Put the bacon under the grill and cook until crispy. Whilst the bacon is grilling, add the butter to a frying pan and the sugar on a medium high heat - do not stir it and put the bananas on top - as the sugar caramelises, the bananas will too - give them about 30 sec on each side and then put them to one side on a plate.

6. Add the bourbon and butter to the sugar, then bubble away until you get a light syrup. DO NOT stick your fingers or tongue in unless you want third degree burns and try explaining the A+E that you were a) stupid enough to do that and b) that you love booze so much you have it as soon as you get up and stick it in your recipes - won't look good.

7. Take the syrup off the heat, your bacon out from under the grill (if you haven't already) and set aside - this all looks like a faff, but you need to get everything ready for the pancakes and then BOOM it's all ready to eat.

8. Put a non-stick frying pan on a high heat and when it gets to temp wipe a piece of kitchen paper dipped in oil around the inside of the pan. Put back on the heat and add two dessert spoons of batter to the pan - these are the thick American/Scotch pancakes type of thing so do not swirl around (hence why we've made a bit of a thicker batter than for crepe style pancakes). When you see bubbles forming on wet/top side of the batter, flip it over using a plastic fish slice or spatula and cook for another minute, then take it off and put it on a plate to keep warm. If you have a small pan, cook one at a time and if not, squeeze two in - you want each pancake to be the size of a saucer and no bigger, but not tiny small.

9. As you are cooking the pancakes, put the syrup back on the heat and warm/thicken up - cook the bacon in the syrup until the bacon is sticky, but don't overcook the syrup (add more bourbon if needed). When you finish the pancakes (cover them to keep warm btw), add the bananas and bacon to the pan you used for the pancakes and caramelise on a high heat for half a minute. Whilst this is happening, stack the pancakes on two plates (make sure you make an equal amount!).

10. Take the bananas and bacon out and put on top of the pancake. Drizzle the syrup over and serve with another glass of Woodford, whilst you're still in your dressing gown and haven't taken your make up off. This breakfast takes the pain out of having children, but is best enjoyed out of their presence, as are most things in life.


Tuck in/drink up

This is my recipe and I'm pretty proud of it, so it's under copywrite. If you want to use it get in touch or when I can be arsed/am not drunk I will come round and enact some Hunter S Thompson style of retribution. If the timings etc suck then let me know and I'll correct them in a begrudging and grumpy manner.